Raspberry Pi Timelapse
Build Details
Work are intending to build a new building and to capture this I set off to create a timelapse of the demolition of the old building and the construction of the new. I decided the best way to accomplish this would be with a Raspberry Pi controlling some sort of camera. The idea I had in mind was to mount the Raspberry Pi and camera in a weatherproof case and use solar power and a WiFi up-link. For the camera I started looking at a USB web cam, using a Microsoft webcam I was able to get it to take stills but not at a high resolution or very reliably. After having no luck with the use of a web cam and not really wanting to buy one myself, I started looking into other options. At work we have a few Canon PowerShot SX100 IS digital cameras that are supported by gPhoto for remote control/capture. Using the full camera I was starting to get things working, but I didn’t take it too far as using a full digital camera presented other problems with mounting and providing power. I then found out about the Raspberry Pi camera, which has native support for capturing stills and even doing timelapse.
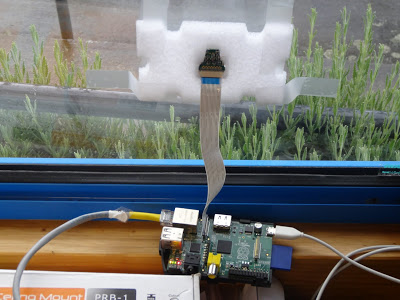
Once the camera arrived, I created a script to be executed once a minute by cron. To save the SD card from fulling up (the photos come out to about 2-2.5GB per day) I set the script up to automatically copy the image to a server running FreeNAS. To make sure this was all working I had the camera taped to my office window and went to sort how I was going to permanently mount it.
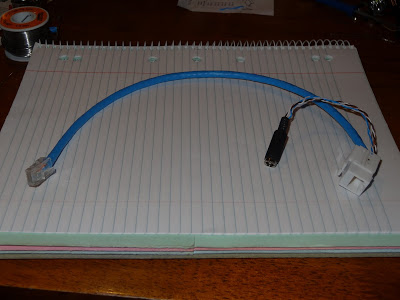
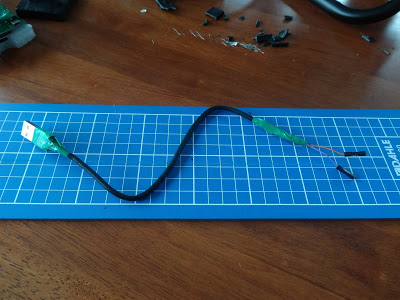
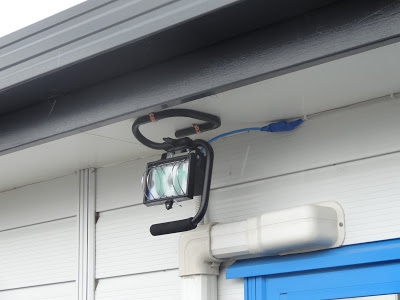
Ideas for the case had me a little stumped as I wanted something waterproof but also cheap. What I came across for this was cheap flood lights, these seem to be the perfect choice as they are low cost, waterproof, have a clear glass front, and are easily mountable. Unfortunately my mind doesn’t remember sizes too well and the lamp I got was not wide enough to have the both the network connection on one side and the power and SD card on the other side connected at the same time. To get around this I got a micro SD to SD adapter for the Raspberry Pi and converted a USB cable to supply power via the GPIO headers.
The next point was how to power the Raspberry Pi when it was mounted outside. As I needed to connect a network cable to get the photos back, power over Ethernet (PoE) sounded like the best choice. To cope with voltage drop across the network cable I started with a 12V power supply. To get this to the required 5V for the Raspberry Pi, I used a USB power supply car adapter as this would be an easy to find device and should be capable of accepting a wide range of voltages around 12V. With the idea and electronics sorted, it was just the matter of connecting the 12V into the brown and blue pair of an Ethernet cable.
With all the parts sorted it was a nice Friday afternoon job to mount the flood light assembly under the eves overlooking the soon to be demolished building and running an Ethernet cable back to the server room with a week to spare before the demolition is scheduled to start.
Scripts
Timelapse photo capture/upload script, run once a minute by cron:
#!/bin/bash
now=$(date +"%Y_%m_%d_%H_%M_%S")
day=$(date +"%Y_%m_%d")
hour=$(date +%k)

# Only take a photo if the time is from 6am and to 9pm
if [ $hour -gt 5 -a $hour -lt 21 ]
then
   raspistill -t 100 -n -o "/timelapse/TL_$now.jpg"

   ssh timelapse@freenas "mkdir -p /timelapse/$day"
   scp "/timelapse/TL_$now.jpg" timelapse@freenas:"/timelapse/$day"

   # Check error code to see if the file was uploaded
   # and if we can therefore delete the local copy
   if [ $? -eq 0 ]
   then
      rm "/timelapse/TL_$now.jpg"
   fi
fi
Test Time Lapse Video
Future Improvements
- Adjustable intervals (including less than a minute)
- Stand alone (Solar power/WiFi communication)
- Automatic creation of daily/weekly videos
- Automatic start/stop time to work with changing daylight hours
Questions?
If you have any questions feel free to contact me
Photos